
Growing up with a bleeding disorder means you’ve got to know how to take care of yourself when it matters most. Maybe you learned to self-infuse at summer camp, and that’s a great first step. Self-infusion helps you manage your bleeding disorder from the comfort of home. It’s a major part of getting older and helping out more with your health. You can be a big help to your mom and dad if you learn the basics of self-infusing. Be sure an adult supervises you to make sure you’re doing everything safely and correctly!
Here are six steps for self-infusing at home:
1. Get ready.
(Above) Do a good job cleaning up the area you’ll use to infuse. Be sure you have plenty of light nearby to keep a sharp eye on what you’re doing. First, wash your hands and arms with soap up to your elbows before you get started—just like a doctor! Don’t forget to wear your latex gloves!
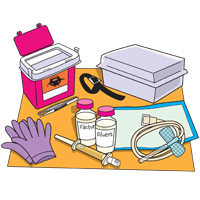
2. Prepare your area.
Now it’s time to get organized. Gather all of your supplies and put them in the area you’ve cleaned up for your infusion. Check the label on your factor to make sure you’ve got the right medicine, and then mix the factor.
3. Get factor ready.
 Before you can get the factor into your body, where it’s needed most, you’ll first need to get it into the syringe. Get an adult to help you prepare the needle and syringe. Ask for help getting the mixed factor into the syringe.
4. Find a good vein.
 Look for a good spot to inject your factor. It might be on the back of your hand, on the inside or back of your lower arm, or on the inside of your arm at the bend of your elbow. Put on a tourniquet (a band tied tightly around the arm) to help the veins to “stand at attention” so that you can see, feel and use them for infusion of factor. Then, using an alcohol swab, clean the part of your hand or arm that will be infused.
5. You’re ready to infuse!
 With the help of an adult, remove the cover of your needle and insert it. You’ll probably see some blood, and that’s OK! “Pop” the tourniquet after the needle is inserted into the vein, when you see blood in the tubing, and before you start pushing in the factor. Next, slowly push the syringe plunger down as you inject factor into your vein. When the syringe is empty, remove the needle. Then, hold a gauze pad on the area you injected for at least one minute. You can cover it with your favorite Band-Aid®!
6. Write it down.
Fill out your log to keep a record of your infusion. Guess what? You’re all done! Good job. Infusing wasn’t so hard, now, was it?
For more articles and fun facts, go to HemAware Jr.